Setting up Lightning Address with Core Lightning
The Problem
I have used a few different solutions for accepting tips/payments with a Lightning Address. I used the one Wallet of Satoshi creates for you (really nice to get push notifications when you get a tip). And I (sort of) set up my own with Satdress which allows you to use your own domain but hand off the invoice creation part.
For those of you that don't know how it works I'll go over it quickly here:
How it's Supposed to Work

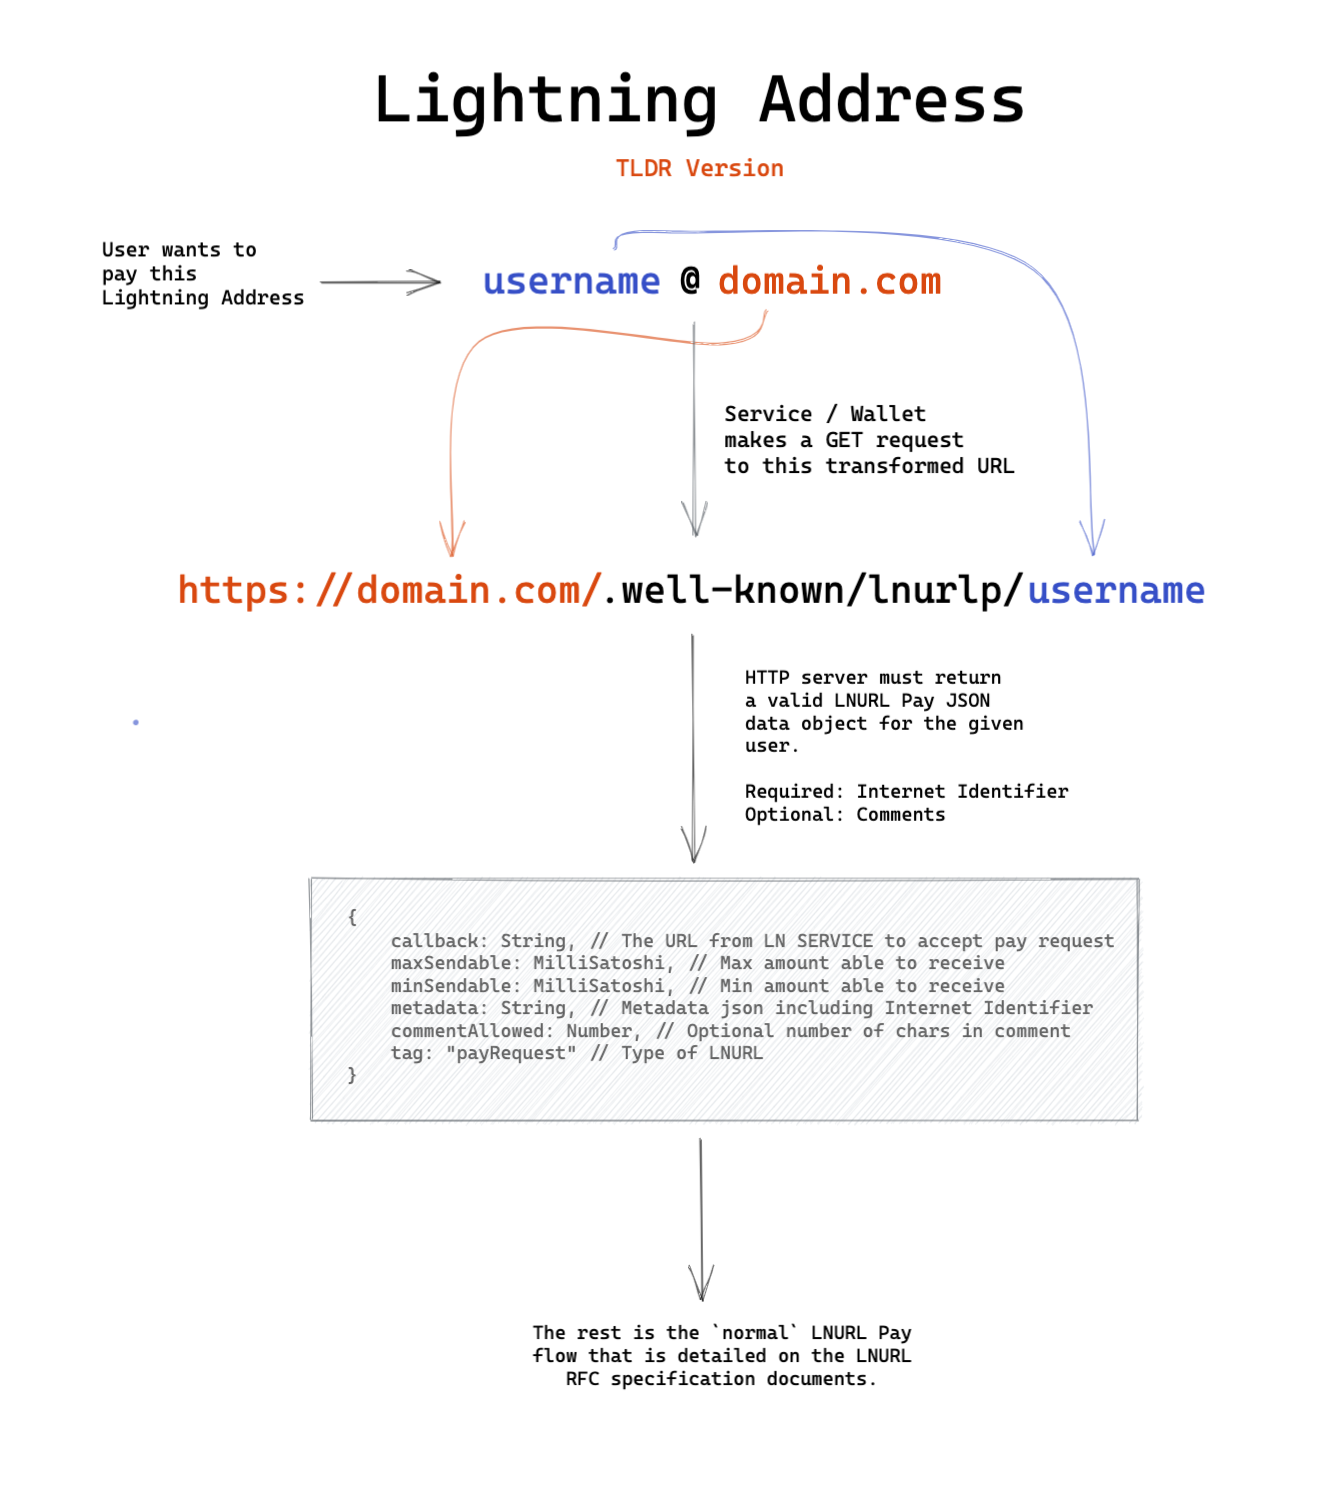
You have a lightning address, in my case I wanted joel@klabo.blog because that's my domain. So the first step is to respond to requests at https://klabo.blog/.well-known/lnurlp/joel. You can see how you could create this URL from the lightning address.
That endpoint should return an object with some data containing a callback URL (where the invoice will get created), a minimum payment, maximum payment, type (always payRequest in this case), a commentAllowed value (how many characters someone paying can add as a comment), and some metadata.
Here is what the object I return from that endpoint looks like:
{
	"tag":"payRequest",
	"minSendable":1000,
	"maxSendable":400000000,
	"commentAllowed":50,
	"callback":"https://klabo.blog/api/lnurlp/invoice",
	"metadata":
		"[[\"text/identifier\",\"joel@klabo.blog\"],[\"text/plain\",\"Send sats to joel@klabo.blog\"]]"
}
Basically this is what a wallet would use to show you a screen where you can choose an amaount and add a comment before getting an invoice.
The Metadata
This will come up again but getting the metadata right took a few tries. If you're doing it yourself I would just copy an example like this and change the parts you need to change. Getting the escaping right took me a little bit.
Another thing to note is that you will need the metadata again when you create the invoice. So you will need to keep track of it somehow.
The Callback
So if someone types joel@klabo.blog into their phone wallet a request is made to get that object. The wallet then shows some UI allowing you to choose an appropriate amount, add a comment etc. Then, it will call the callback URL you provide expecting another object containing the actual Bolt 11 invoice.
Creating the Invoice
This is where I started running into trouble. I kept creating invoices, initially using my LNBits instance but I kept getting an error: Invalid hash (from Wallet of Satoshi specifically).
Apparently when you create an invoice for use with Lightning Address you need to have a description hash and not a description in the encoded Bolt 11 invoice. Luckily Core Lightning does have a way to do this by using the deschashonly flag (more info here).
deschashonly or 'Description hash only` hashes your description and uses that instead. Apparently this allows for larger descriptions.
Using the Right Description
Like I mentioned before, the metadata string used earlier would be necessary later on. That string is what you put into your description when creating the invoice, and using deschashonly hashes it. That is the hash that was invalid before.
It may have been user error but I was unable to get this working using LNBits to create my invoices, I had to use the lightning-rpc directly to do it.
Since I'm using this on my blog server I wanted to be able to do that in Javascript. There were some options out there LNSocket, LNMessage. But, I decided I wanted to do it myself. And, because in my case my node is running on the same server I didn't need runes or anything for authentication, I could just connect a socket to the lightning-rpc directly.
Creating Invoices on My Server
I thought I should share this code here just becuase I found it difficult to get examples of this but it is pretty specific to my setup. Here it is:
import net from 'net';
import crypto from 'crypto';

export default function LightningRPC(path) {

	this.path = path;
	this.socket = openSocketConnection(path);

	this.call = function(method, params, callback) {
		this.currentCallback = callback;
		const id = crypto.randomBytes(16).toString("hex");
		this.socket.write(JSON.stringify({jsonrpc: "2.0", method: method, params: params, id: id}));
	}

	this.invoice = function(msatoshi, description, callback) {
		const params = {
			"msatoshi": msatoshi,
			"label": crypto.randomBytes(16).toString("hex"),
			"description": description,
			"deschashonly": true
		};
		this.call("invoice", params, callback);
	}


	this.socket.on('data', (data) => {
		const response = JSON.parse(data.toString());
		if (this.currentCallback) {
			this.currentCallback(response);
		}
	});

	function openSocketConnection(path) {
		const socket = net.createConnection(path, () => {
			console.log('connected to server!');
		})
		return socket;
	}
}
And then here is the code for using this to respond to a Lightning Address request:
import LightningRPC from "./lightningRpc";

export default function LightningAddress() {

	this.rpc = new LightningRPC("/home/azureuser/.lightning/bitcoin/lightning-rpc");

	this.metadataString = "[[\"text/identifier\",\"joel@klabo.blog\"],[\"text/plain\",\"Send sats to joel@klabo.blog\"]]"

	this.initialResponse = {
		"tag": "payRequest",
		"minSendable": 1000,
		"maxSendable": 400000000,
		"commentAllowed": 50,
		"callback": "https://klabo.blog/api/lnurlp/invoice",
		"metadata": this.metadataString
	}

	this.invoice = function(msatoshi, callback) {
		this.rpc.invoice(msatoshi, this.metadataString, (response) => {
			callback(response);
		});
	}
}
I don't think I'm doxxing anything critical here.
Conclusion
Once I had that all wired up I got my first successful Lightning Address payment to go through 🎉 I hope this helps someone get unstuck trying to figure this out!
Here are some resources to learn more about things I mentioned: